Using ArcMap
The following notes are based on ESRI ArcGIS server version 10.5 (SP1)
WMS
Creating the service
Prepare the map document
Initial set up of WMS services is relatively straightforward and simply requires the creation of a map document (.mxd) containing the data you want to add to the service.
It is important to pay attention to the layer names in the map document, since the individual service layer names will use the map document layer names. The service will also use the map document layer names for the respective layer titles in the GetCapabilities document.
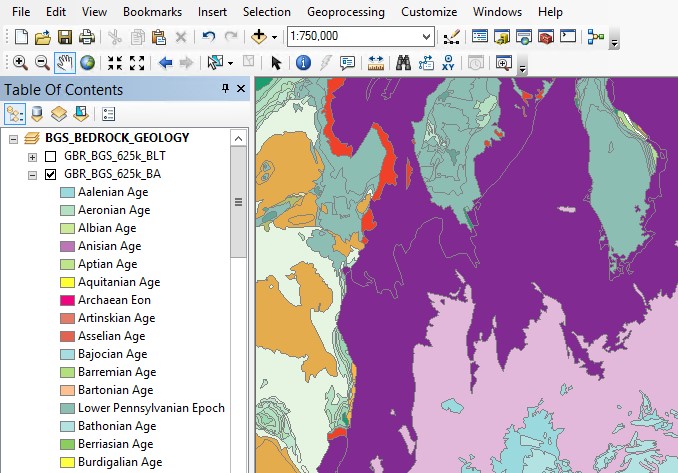
Figure 1 - Using ArcMap layer names in the service
Eg. an unmodified GetCapabilities (version 1.3.0) response for the above example would look like:
<Layer>
<Title>BGS_BEDROCK_GEOLOGY</Title>
<CRS>CRS:84</CRS>
<CRS>EPSG:4326</CRS>
...
<Layer queryable="1">
    <Name>GBR_BGS_625k_BA</Name>
    <Title>GBR_BGS_625k_BA</Title>
    <Abstract></Abstract>
    <CRS>CRS:84</CRS>
    <CRS>EPSG:4326</CRS>
   ...
    <Style>
        <Name>default</Name>
        <Title>GBR_BGS_625k_BA</Title>
        <LegendURL width="68" height="2048">
            <Format>image/png</Format>
            <OnlineResource xlink:href="..." xlink:type="simple"/>
        </LegendURL>
    </Style>
</Layer>
<Layer queryable="1">
    <Name>GBR_BGS_625k_BLT</Name>
    <Title>GBR_BGS_625k_BLT</Title>
    <Abstract></Abstract>
...
Publishing your WMS
Once you are happy with the layer names, the easiest way to publish your WMS is doing it directly from the map document:
Go to File > Share As > Service… to open the Share as Service dialog.
Select Publish a service and click Next >.
On the Publish a Service dialog, choose/add a connection to your ArcGIS Server instance and write a name for your map service. The name you enter will be part of the WMS url, so you must ensure that meets the OneGeology profile naming conventions. Click Next >.
Select whether to Use existing folder or Create new folder. The folder name will also appear as part of the WMS url. Click Continue.
In the Service Editor dialog, go to Capabilities and select WMS. If you wish, you can unselect KML.
Note
If you do not want to expose the data behind your WMS service, make sure that the WFS option is unselected.
Now go to Capabilities > WMS to access the WMS properties
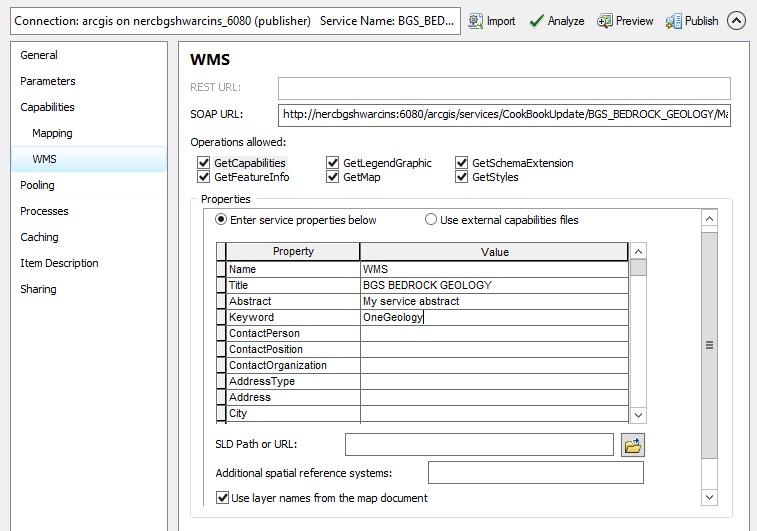
Figure 2 - Adding a new WMS service in ArcGIS
You will be presented with a form to edit your service level metadata (as above) or you may opt to use external capabilities. We suggest at this stage that you should use the form to fill in as much detail as possible, though you should note that you will eventually need to use external files to enter any layer level metadata and add missing service level metadata parameters; we can use the data you enter initially as the basis for these external static files.
You also need to tick the Use layer names from the map document option; otherwise, the layer names will be given numbers instead. Again, you will need to ensure that the ArcMap layer names follow the naming guidelines.
ArcGIS Server creates only one style named default for every layer, but allows you to do include additional styles for each layer using a SLD file. The default style matches the symbology set in the map document.
Once you finish configuring your WMS, click Publish on the top-right corner of the Service Editor dialog to create your service.
Your new service will have a URL like below, with the folder name part being optional:
http://[hostname]/ArcGIS/services/[folder name]/[map service title]/MapServer/WMSServer
Edit the GetCapabilities documents
ArcGIS Server doesn’t create any static GetCapabilities xml documents, but does allow you to use external files. You will need to use such external files if you want to add any additional spatial reference systems, correct the keywords listing, change the LegendURL images, add better abstracts and layer titles, or add an INSPIRE extended capabilities section. We think to provide a fully compliant WMS it is highly likely that you will need to use a set of static files.
The first step to editing your files is to create them.
The quickest way to do this is to use the response documents from your initial service. You will need to have a file for all the WMS versions that you want your service to support. We require at least a version 1.3.0 document but you could also have a 1.1.1 response.
Your WMS version 1.1.1 GetCapabilities document is generated using a request like:
http://[hostname]/ArcGIS/services/[folder name]/[map service title]/MapServer/WMSServer?service=WMS&request=GetCapabilities&version=1.1.1&
Save this as [short service name]111.xml
Your WMS version 1.3.0 GetCapabilities document is generated using a request like:
http://[hostname]/ArcGIS/services/[folder name]/[map service title]/MapServer/WMSServer?service=WMS&request=GetCapabilities&version=1.3.0&
Save this as [short service name]130.xml
It doesn’t really matter what name you give these files, as long as you use the same name prefix for all files that belong to the same service.
You need to put these files on the server (or at a location available to your server), and make them browsable. These files only need to be browsable internally by the ArcGIS server.
Now go back to your map service and edit it using either ArcGIS Server Manager or ArcMap.
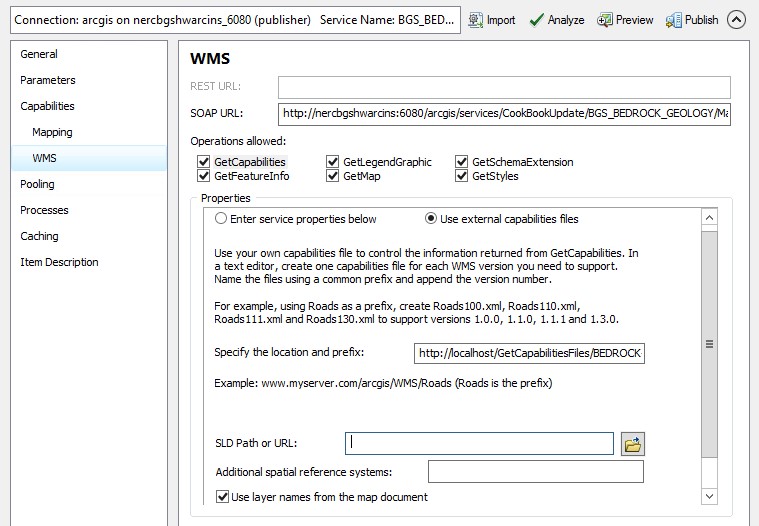
Figure 3 - Setting up external capabilities files
Select WMS, then select the Use External capabilities files option and in the Specify the location and prefix dialog add the web address to the folder containing the capabilities response documents plus your [short service name] prefix.
For example, for a service called BGS_BEDROCK_GEOLOGY, we may save our initial GetCapabilities response documents using a prefix “BEDROCK-“, giving us a file called BEDROCK-130.xml for our version 1.3.0 GetCapabilities response document, BEDROCK-111.xml for our version 1.1.1 GetCapabilities response document. We might then save these to a location on our web server such as C:\Inetpub\wwwroot\GetCapabilitiesFiles\, which would be browsable locally as http://localhost/GetCapabilitiesFiles/. When we select the “Use External capabilities files” option, we then provide the web address and prefix as http://localhost/GetCapabilitiesFiles/BEDROCK-
Having created your files, you may then edit them as required. We would recommend you make a second copy of the files in case you make an error whilst editing.
INSPIRE
If you want your OneGeology service to comply to INSPIRE standards, in addition to meet the requirements of the OneGeology profile, you need to ensure that the following conditions are fulfilled:
Layer name and layer title must follow INSPIRE naming conventions. For example the D2.8.II.4 Data Specification on Geology–Technical Guidelines tell us (section 11.1 ~ Layers to be provided by INSPIRE view services) that any layer to do with lithology or age must have the name GE.GeologicUnit and title Geologic Units. See the layer-naming discussion on the INSPIRE Thematic Clusters Geology forum for fuller details.
Layers must support at least one of the INSPIRE coordinate systems. See D2.8.I.1 INSPIRE Specification on Coordinate Reference Systems - Guidelines.
Your GetCapabilities document must include the INSPIRE Extended Capabilities tag.
There are two ways of achieving these conditions using ESRI software. The first one is using a standard ArcGIS map document and standard ArcGIS Server tools, where you’ll need to modify layer names to make them compliant, change service properties to include required coordinate systems and modify the get capabilities document to include the INSPIRE Extended Capabilities section. The second option is using the ArcGIS for INSPIRE extension, which provides tools and new services to ensure compliance with INSPIRE directives. If you want to go for the second option, there is an ESRI OneGeology Grant for OneGeology members.
ArcGIS Server
INSPIRE Layer Names
In order to make your service INSPIRE compliant, you will need to configure the name of your layers (e.g. GE.GeologicUnit); however, this clashes with OneGeology naming standards. In this situation, it is desirable to create a group layer. For example, you may want to create a layer called GE.GeologicUnit to group all of your layers that are spatial objects of type GeologicUnit. The layer name and title rules set out in the OneGeology profile relate to the grouped (or child) layers, whereas the INSPIRE name and title relate to the group (or parent) layer.
If your INSPIRE service is only serving layers of one type, one way of applying group layering would be to use the root layer name and title (not service name and title) as the grouping layer. If, on the other hand, your INSPIRE service is serving layers of several types (e.g. GE.GeologicUnit and GE.GeologicFault), we believe the only option is for you to configure actual group layering.
To add group layers to a new service simply add a group layer to the map document that will create your service, rename it and place your layers inside. The WMS service published form this map document will keep the same group layer structure.
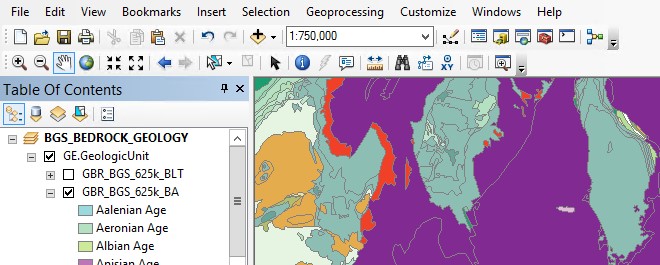
Figure 4 - Adding group layers to the service
If you want add group layers to an existing service, open the map document that created the service, modify it as described above and publish it again as a WMS service; however, when publishing the service, make sure that you select the option “Overwrite an existing service”. This will save you having to delete the original service as well as having to type again all service properties.
Note that ArcGIS Server will generate only the <Title> tag of group layers in the GetCapabilities document. The content of this tag will be the same that you wrote in the map document. In order to comply with INSPIRE layer naming regulations for group layers, you will need to manually add the <Name> tag, filling it in with the adequate group layer name, by editing the GetCapabilities document using an external capabilities file.
Group layers created in ArcGIS Server will not have a style associated to them and the group layer itself will not display a map.
INSPIRE Coordinate Systems
ArcGIS Server always adds 2 coordinate systems: EPSG:4326 (or CRS:84 for version 1.3.0) and the coordinate system set on the map document creating the service. To add any additional coordinate systems go to your map service and edit it using either ArcGIS Server Manager or ArcMap. On the Service Editor dialog go to Capabilities > WMS and, in the Additional spatial reference systems text box, type any well-known EPSG ID in the format indicated below.

Figure 5 - Additional spatial reference systems option
INSPIRE extended capabilities
The extended capabilites section is inserted into your external GetCapabilities section, between the Exception element block and the first Layer element.
For example to add a scenario 1 INSPIRE extended capabilities section (where you have an external XML document or service that provides such an XML document containing metadata for your WMS service) you would insert a section like below:
</Exception>
<inspire_vs:ExtendedCapabilities xmlns:inspire_vs="http://inspire.ec.europa.eu/schemas/inspire_vs/1.0">
<inspire_common:MetadataUrl xsi:type="inspire_common:resourceLocatorType">
<inspire_common:URL>http://metadata.bgs.ac.uk/geonetwork/srv/en/csw?SERVICE=CSW
&REQUEST=GetRecordById&ID=7822e848-822d-45a5-8584-56d352fd2170&elementSetName=full&OutputSchema=csw:IsoRecord&
</inspire_common:URL>
<inspire_common:MediaType>application/xml</inspire_common:MediaType>
</inspire_common:MetadataUrl>
<inspire_common:SupportedLanguages>
<inspire_common:DefaultLanguage>
<inspire_common:Language>eng</inspire_common:Language>
</inspire_common:DefaultLanguage>
</inspire_common:SupportedLanguages>
<inspire_common:ResponseLanguage>
<inspire_common:Language>eng</inspire_common:Language>
</inspire_common:ResponseLanguage>
</inspire_vs:ExtendedCapabilities>
<Layer>
Alternatively, to add a scenario 2 INSPIRE extended capabilities section (where you have no external metadata document for your WMS service) you would insert a section like below:
</Exception>
<inspire_vs:ExtendedCapabilities xmlns:inspire_vs="http://inspire.ec.europa.eu/schemas/inspire_vs/1.0">
    <inspire_common:ResourceLocator>
        <inspire_common:URL>http://ogc2.bgs.ac.uk/cgi-bin/BGS_OGE_Bedrock_and_Surface_Geology_in3/ows?</inspire_common:URL>
    </inspire_common:ResourceLocator>
    <inspire_common:ResourceType>service</inspire_common:ResourceType>
    <inspire_common:TemporalReference>
        <inspire_common:DateOfLastRevision>2015-10-23</inspire_common:DateOfLastRevision>
    </inspire_common:TemporalReference>
    <inspire_common:Conformity>
        <inspire_common:Specification>
            <inspire_common:Title>-</inspire_common:Title>
            <inspire_common:DateOfLastRevision>2015-10-23</inspire_common:DateOfLastRevision>
        </inspire_common:Specification>
        <inspire_common:Degree>notEvaluated</inspire_common:Degree>
    </inspire_common:Conformity>
    <inspire_common:MetadataPointOfContact>
        <inspire_common:OrganisationName>Mr Matthew Harrison</inspire_common:OrganisationName>
        <inspire_common:EmailAddress>enqiries@bgs.ac.uk</inspire_common:EmailAddress>
    </inspire_common:MetadataPointOfContact>
    <inspire_common:MetadataDate>2015-10-23</inspire_common:MetadataDate>
    <inspire_common:SpatialDataServiceType>view</inspire_common:SpatialDataServiceType>
    <inspire_common:MandatoryKeyword xsi:type='inspire_common:classificationOfSpatialDataService'>
        <inspire_common:KeywordValue>infoMapAccessService</inspire_common:KeywordValue>
    </inspire_common:MandatoryKeyword>
    <inspire_common:SupportedLanguages>
        <inspire_common:DefaultLanguage>
            <inspire_common:Language>eng</inspire_common:Language>
        </inspire_common:DefaultLanguage>
    </inspire_common:SupportedLanguages>
    <inspire_common:ResponseLanguage>
        <inspire_common:Language>eng</inspire_common:Language>
    </inspire_common:ResponseLanguage>
</inspire_vs:ExtendedCapabilities>
<Layer>
In addition (for both scenarios) you will need to reference the inspire_common schema and namespace in your root element, so it will become something like:
<WMS_Capabilities
    xmlns:inspire_common="http://inspire.ec.europa.eu/schemas/common/1.0"
    xmlns="http://www.opengis.net/wms" xmlns:xsi="http://www.w3.org/2001/XMLSchema-instance"
    xmlns:esri_wms="http://www.esri.com/wms"
    version="1.3.0"
    xsi:schemaLocation="http://www.opengis.net/wms http://schemas.opengis.net/wms/1.3.0/capabilities_1_3_0.xsd
    http://inspire.ec.europa.eu/schemas/inspire_vs/1.0 http://inspire.ec.europa.eu/schemas/inspire_vs/1.0/inspire_vs.xsd
    http://www.esri.com/wms http://../arcgis/services/.../MapServer/WmsServer?version=1.3.0%26service=WMS%26request=GetSchemaExtension">
INSPIRE Extension
The ArcGIS for INSPIRE extension allows to create an INSPIRE compliant WMS through a new ESRI map service, specific to this extension, called INSPIRE View service. In our experience, creating a INSPIRE compliant WMS service using custom INSPIRE extension tools is more difficult than using standard ArcGIS tools, due to the complexity of the datasets that you have to use, the scarce amount of documentation and the limited ESRI support for the extension.
Create INSPIRE geodatabase
The first step to use ArcGIS for INSPIRE is creating a geodatabase with one of the templates supplied by the extension. To create a geodatabase for Geology follow the steps in this document in sections 3.3.1 and 3.3.4.
Populate INSPIRE geodatabase
Fill in the geodatabase with your data. There are multiple feature classes and tables; fill in the ones that are relevant to you.
Note that all feature classes will be grouped on a feature dataset called GE. You’ll need to add your features to the appropriate feature class so that they can be used by the INSPIRE extension. Feel free to add new fields to these feature classes if you want to show attributes not available by default on the template; however, refrain from deleting any existing field as you might break one of the multiple relationships set on the template.
Customise layers in INSPIRE geodatabase
You’ll do this by modifying the LayerInfo table. In this extension, each INSPIRE layer consists normally of four hidden sublayers. We need to modify the LayerInfo table to make the relevant sublayers visible and to be able to change the name and title of the sublayers (see Customization Guide). The INSPIRE layer will act as a group layer and will follow INSPIRE naming conventions. The sublayers will follow OneGeology naming conventions. In the following example, we are going to configure two sublayers to represent bedrock units symbolised by age and by lithology. These layers are going to be looking at the same feature class in the geodabase template, defined in the FC_NAME field as geUnitS (short for geology unit surface). Given that in this example we are dealing only with geologic features represented as polygons, the final LayerInfo table could look like this (table transposed for visibility reasons):
|
FIELD NAME |
ROW 1 |
ROW 2 |
ROW 3 |
|
OBJECTID |
2 |
4 |
12 |
|
ID |
417 |
420 |
421 |
|
THEME |
Geology |
Geology |
Geology |
|
FC_NAME |
- |
geUnitS |
geUnitS |
|
STYPE |
-1 |
-1 |
-1 |
|
APP_SCHEMA |
Geology |
Geology |
Geology |
|
IR_VERSION |
0 |
0 |
|
|
LAYER_NAME |
GE.GeologicUnit |
GBR_BGS_625k_BA |
GBR_BGS_625k_BLT |
|
LAYER_TITLE |
Geologic Units |
GBR BGS 1:625k Bedrock Age |
GBR BGS 1:625k Bedrock Lithology |
|
SPATIAL_OBJECT_TYPE |
- |
MappedFeature |
MappedFeature |
|
DEF_QUERY |
- |
- |
- |
|
PARENT_ID |
-1 |
417 |
417 |
|
SPATIAL_OBJECT_ TYPE_PREFIX |
ge |
ge |
ge |
|
LAYER_KEYWORDS |
Geology, Lithology, Age, Geologic unit |
Geology, Lithology, Age, Geologic unit |
Geology, Lithology, Age, Geologic unit |
|
IS_HIDDEN |
0 |
0 |
0 |
|
IS_VISIBLE |
1 |
1 |
1 |
|
MIN_SCALE |
|
||
|
MAX_SCALE |
|
||
|
GDBTEMPLATE_NAME |
GE |
GE |
GE |
Table 1 Custom Layer Info table
Rows with ID = 417 and ID = 420 were kept; the remaining rows were deleted. In addition, a new row with ID = 421 was added. Note that you don’t need to delete any row, this was done purely to create a simpler example.
As specified in the PARENT_ID field, row ID 417 is the group layer, whereas rows 420 and 421 are its sublayers.
The group layer doesn’t point to any feature class. Both child layers point at the same feature class (geUnitS), since we want the same dataset with different symbology (this can be set once layers are loaded on the map document).
Group layer name and title must conform to INSPIRE standards. Child layer titles must conform to OneGeology standards (ideally layer names too, but the GetCapabilities document created with the ArcGIS for INSPIRE extension doesn’t honour the layer names defined on the LayerInfo table if more than one layer is pointing at the same feature class).
Child layers must have a value of 0 in the IS_HIDDEN field so that they are visible on the INSPIRE VIEW service.
Add INSPIRE layers to your map document
Open a map document and add your layers to the map using the Add INSPIRE Layer button (if you can’t see this button, make sure that you have the INSPIRE Tools toolbar enabled).
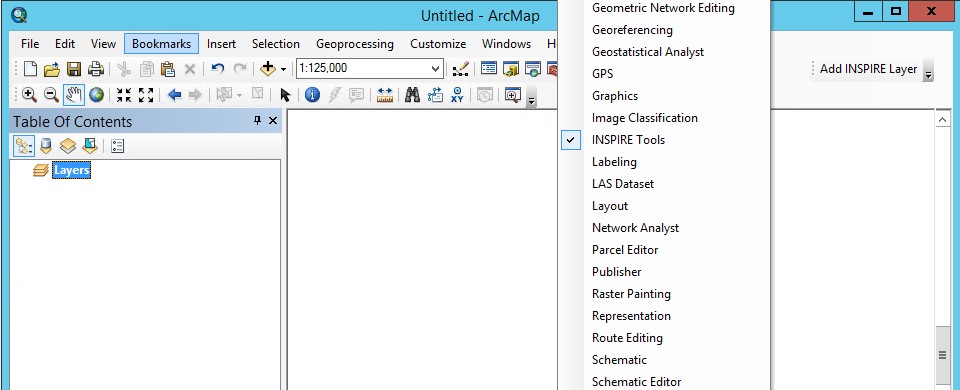
Figure 6 - Add INSPIRE Tools to map document
This will open INSPIRE Layer Wizard where you can first select your INSPIRE database and second select the INSPIRE layers you wish to add. Note that this dialog will reflect changes done in the LayerInfo table therefore your custom layers should now be available. See Create the INSPIRE View Service map document.
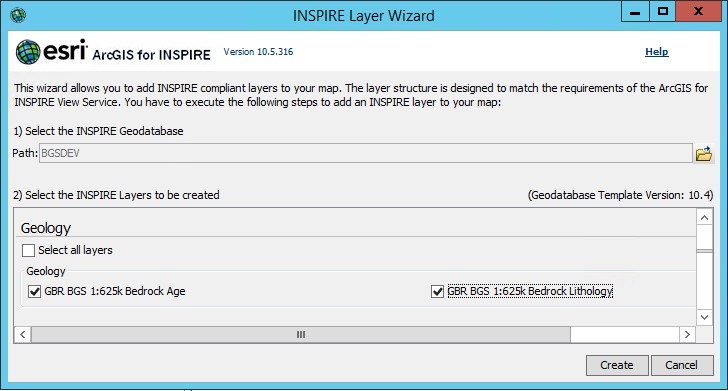
Figure 7 - INSPIRE Layer wizard
Click Create, and your selected layers will be added to the map document. The LayerInfo table specifies the hierarchical structure of the layers in the service as well as their names and titles, so we don’t need to (and shouldn’t) modify the layer names in the map document.
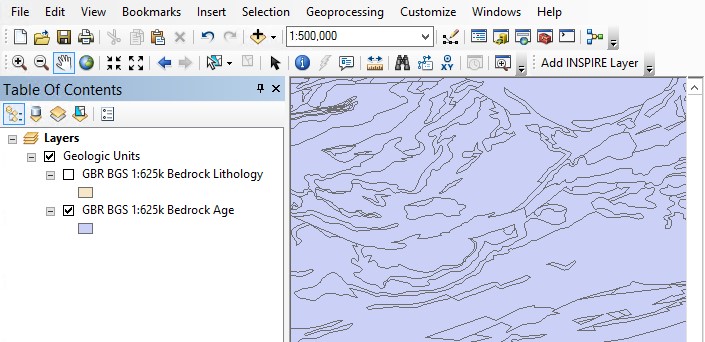
Figure 8 - INSPIRE layers on map document
Note that, as well as the layers shown on the map, a few tables have also been added to the map document. These tables are required for the creation of the INSPIRE service therefore they shouldn’t be removed.
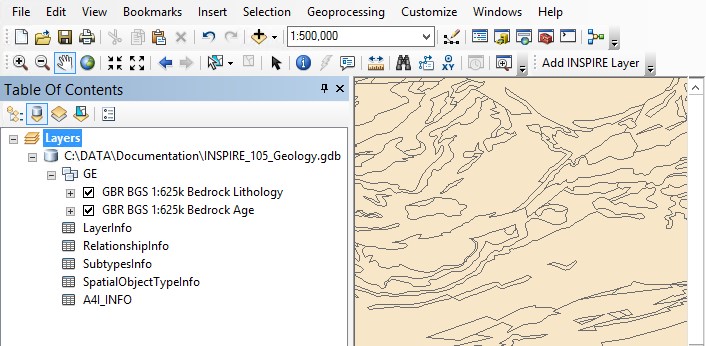
Figure 9 - Additional INSPIRE related tables added to map document
Now you can proceed to style your layers using the appropriate symbology. The symbology set on the map document will be defined within the GetCapabilities document as a style named default. In addition, each layer will have another style called inspire_common:DEFAULT, which is meant to assign by default a common style to INSPIRE layers; however, in ArcGIS server version 10.5, this default visualization style only supports Annex I INSPIRE layers.
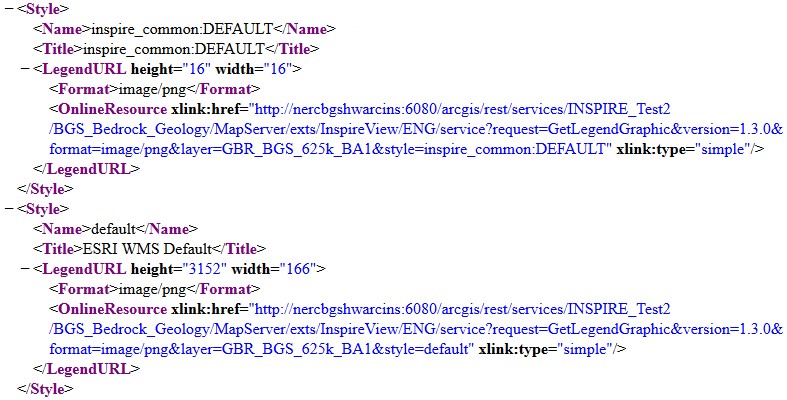
Figure 10 - Each INSPIRE layer will have 2 styles: inspire_common:DEFAULT and default
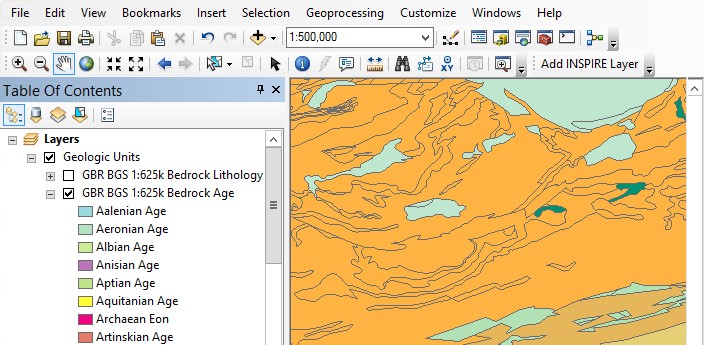
Figure 11 - The symbology set in the map document will correspond to the default style
Publish INSPIRE View service
A INSPIRE View service is the ESRI equivalent of a INSPIRE compliant WMS. Publishing a INSPIRE View service is very similar to publishing a WMS, the only difference being that you need to select and configure one additional capability.
Go to File > Share As > Service… to open the Share as Service dialog.
Select Publish a service and click Next >.
On the Publish a Service dialog, choose/add a connection to your ArcGIS Server instance and write a name for your map service. The name you enter will be part of the WMS url, so you must ensure that meets the OneGeology profile naming conventions.
Select whether to Use existing folder or Create new folder. The folder name will also appear as part of the WMS url. Click Continue.
In the Service Editor dialog, go to Capabilities. You’ll notice that the ArcGIS for INSPIRE extension has added three new capabilities. Select WMS and ArcGIS for INSPIRE View Service. Note that in order for the INSPIRE View service to work, the WMS capability must be enabled.
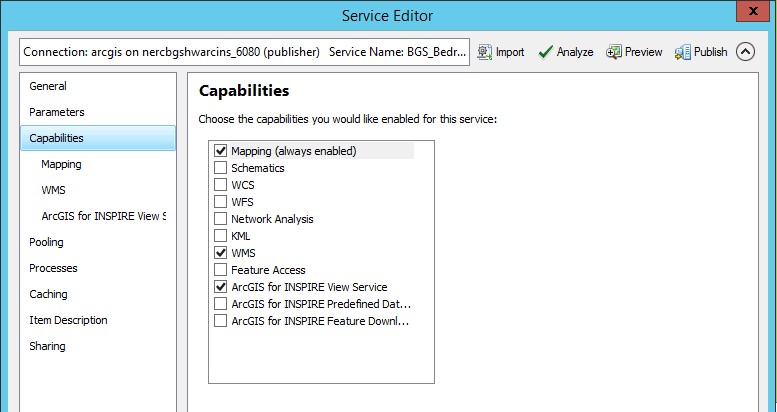
Figure 12 - Capabilities option in Service Editor dialog
Now go to Capabilities > ArcGIS for INSPIRE View Service to access the INSPIRE View Service properties
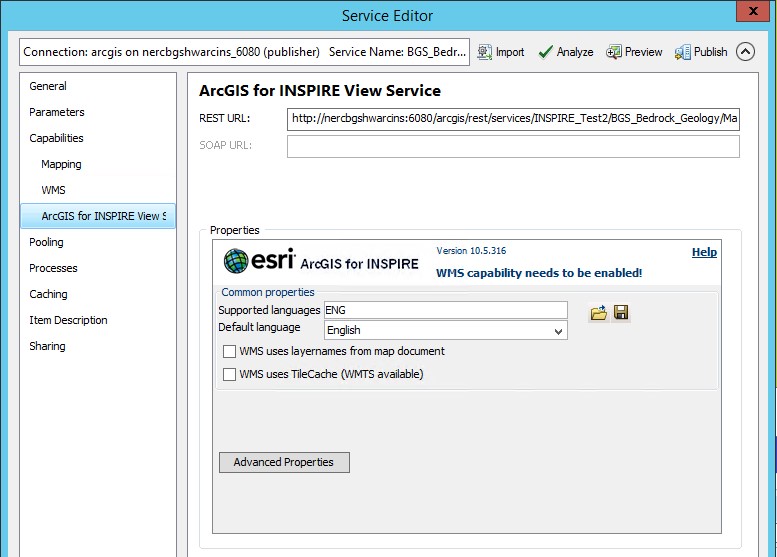
Figure 13 - ArcGIS for INSPIRE View Service properties in Service Editor dialog
The properties of the above dialog can be left as they are, unless you want to modify the supported languages. Also, make sure that if you checked the Use layer names from the map document option in the WMS capabilities, you also check the WMS uses layernames from map document option in the ArcGIS for INSPIRE View Service capabilities. This won’t affect your INSPIRE View Service, only the WMS service that is being created in parallel.
Click Publish on the top-right corner of the Service Editor dialog to create your service. We’ll deal with Advance Properties after the service has been published because the properties for INSPIRE layers will be available then.
For more information go to Create an INSPIRE View Service.
Configure INSPIRE View service
Once the service has been published, we are going to use ArcCatalog to configure INSPIRE View service properties which will be reflected on the service’s GetCapabilities document.
On ArcCatalog, go to the GIS Servers folder, select the appropriate instance of ArcGIS Server and navigate to your service.
Right-click on the service and go to Service Properties…
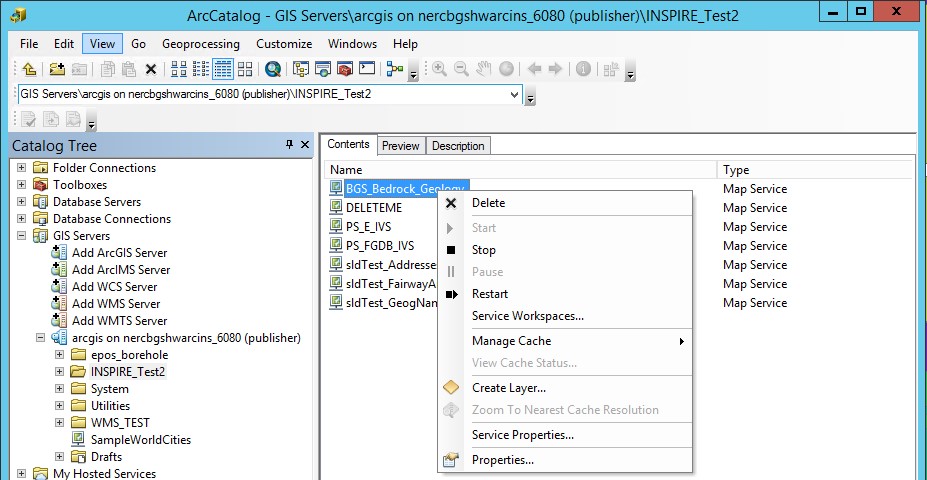
Figure 14 - Accessing Service Properties
On the Service Editor go to Capablities > ArcGIS for INSPIRE View Service (see figure 13) and click Advanced Properties to open the Editing the InspireView properties dialog.
The Editing the InspireView properties dialog allows you to set the options below. Fields in yellow are compulsory and, depending on the options you choose, there might be disabled fields in grey. We recommend you fill in as many fields as you can.
Select INSPIRE external capabilities scenario

Figure 15 - Inspire View properties: extended capabilities type
Service properties. Do not modify Online resource on this dialog, as it will change the value of the property xlink:href in all OnlineResource tags in the get capabilities document. You’ll need create a custom GetCapabilities document if you want to change the tag /WMS_Capabilities/Service/OnlineResource to provide a link to the data owner organization web site, or web site with information about the data owner organization, as requested in the OneGeology profile.
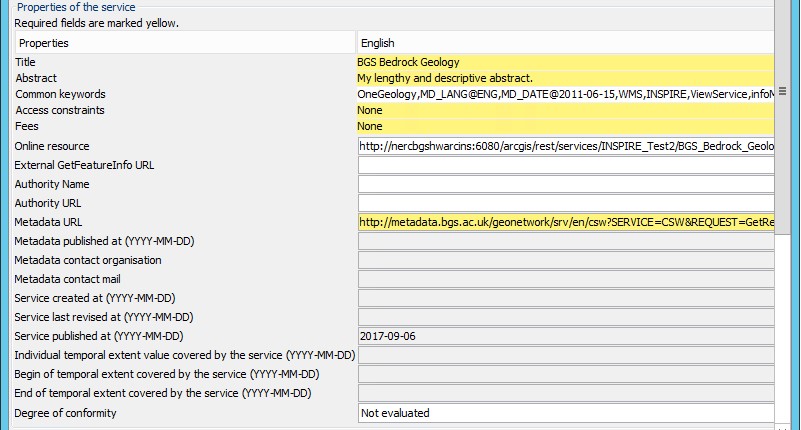
Figure 16 - Inspire View properties: service information
Contact information
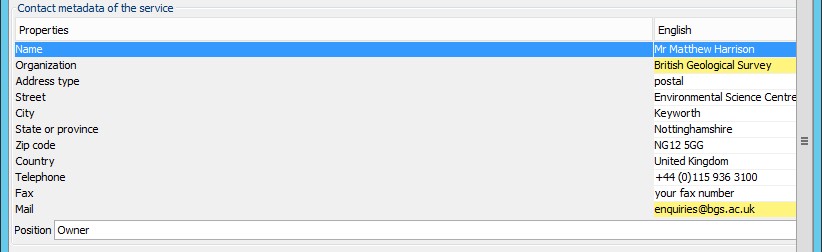
Figure 17 - Inspire View properties: contact information
GEMET Keywords

Figure 18 - Inspire View properties: GEMET Keywords
Layer properties. Note the highlighted sublayer names. One of them doesn’t honour the name defined in the LayerInfo table, taking the name of the other sublayer and adding “1” at the end of it. This seems to be a bug within the INSPIRE extension. Since OneGeology naming conventions for layer names are only a recommendation, the service will still comply with the OneGeology profile.
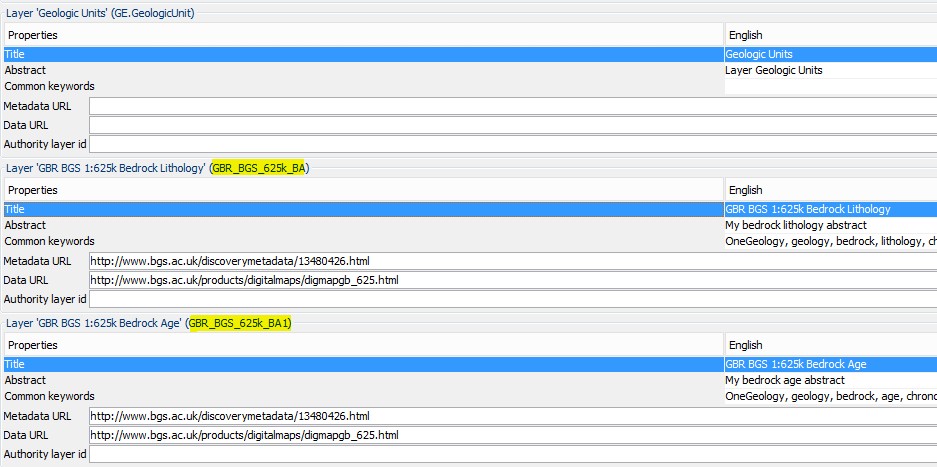
Figure 19 - Inspire View properties: Layers information
Custom INSPIRE View service GetCapabilities document
If you need to modify any option that’s not on the Editing the InspireView properties dialog, like the Online Resource tag mentioned above, you need to go to the service cached capabilities folder (C:\arcgisserver\directories\arcgisforinspire\[folder_name]\[map service title]_MapServer\[folder_name]_ [map service title]_MapServer_inspireview) and create a file called GetCapabilities<version>_<3 letter language code>.xml. Your service will now use the custom GetCapabilities file instead of the dynamically created one (e.g. GetCapabilities130_ENG.xml), also stored in the same location. When creating your custom file it’s recommended to start from a copy of the dynamically created file.
Use INSPIRE View service
Your service will be accessible from the following endpoint:
http://[hostname]/ArcGIS/services/[folder_name]/[map service title]/exts/InspireView/service
For more information see Use an INSPIRE View service.
ArcGIS server issues
When using the SLD parameter to get an external SLD file, ArcGIS 10.0 expects the layer name and styles parameter to be to be sent as part of a GetMap request, even though this is not required by the WMS+SLD specification. A bug has been raised with ESRI on this issue (NIM095568) back in version 10.0, but it’s still present.
Simple Feature WFS
Creating a simple feature WFS requires almost the same steps as creating a WMS. The only difference being that, when publishing the service, you need to select the WFS capability.
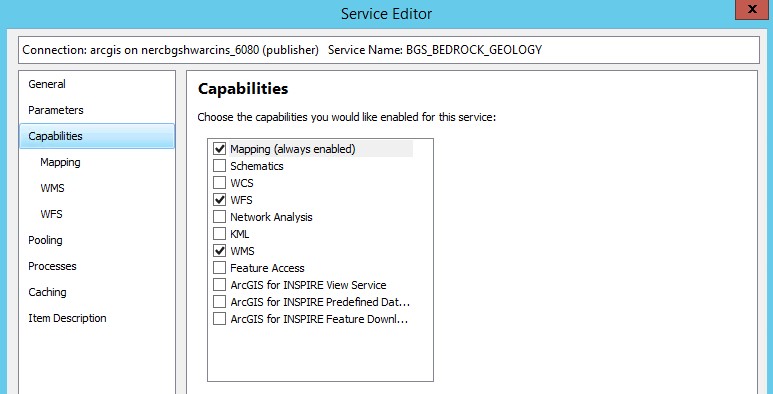
Figure 20 - Enabling WFS capabilities in Service Editor dialog
After activating WFS, you’ll have access to the properties of this capability. Some of these properties will coincide with WMS properties, but there will also be WFS specific properties, such us namespace, prefix or maximum number of features returned.
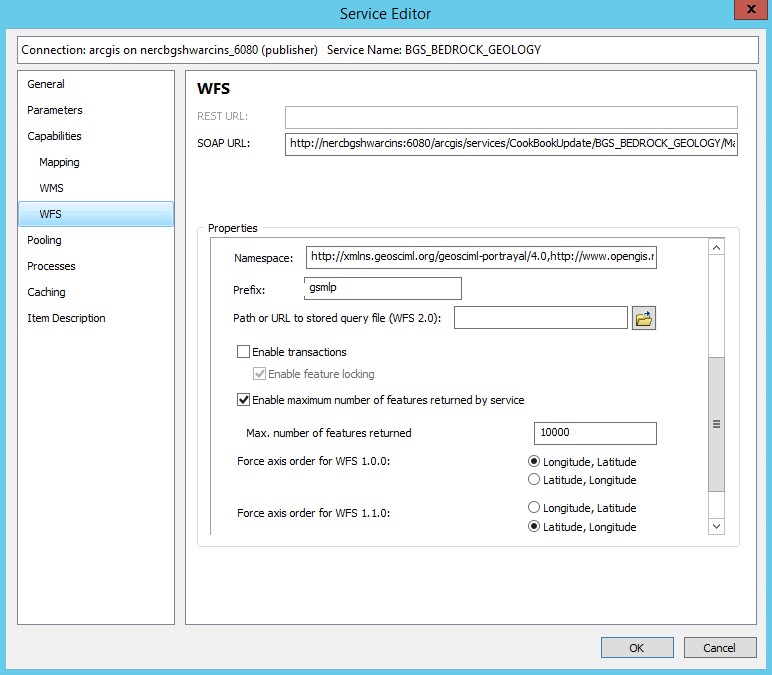
Figure 21 - WFS service properties
For more information on how to create a simple feature WFS service and how to edit its GetCapabilities document, go to the WMS section of this cookbook or to ESRI’s documentation about WFS services.
WCS
Create a map document
In ArcGIS, a WCS can be created mainly through 3 routes: a map document with raster data, a raster dataset or a mosaic dataset. Publishing a mosaic dataset requires ArcGIS Image Server, so unless you have this extension enabled, the only way to publish multiple rasters at once on a single WCS will be through a map document; therefore we’re are going to focus on this route. For more information see WCS services.
Start by creating a map document and adding your rasters to it. Note that, if you have feature data in your map document, it’ll be excluded from your WCS.
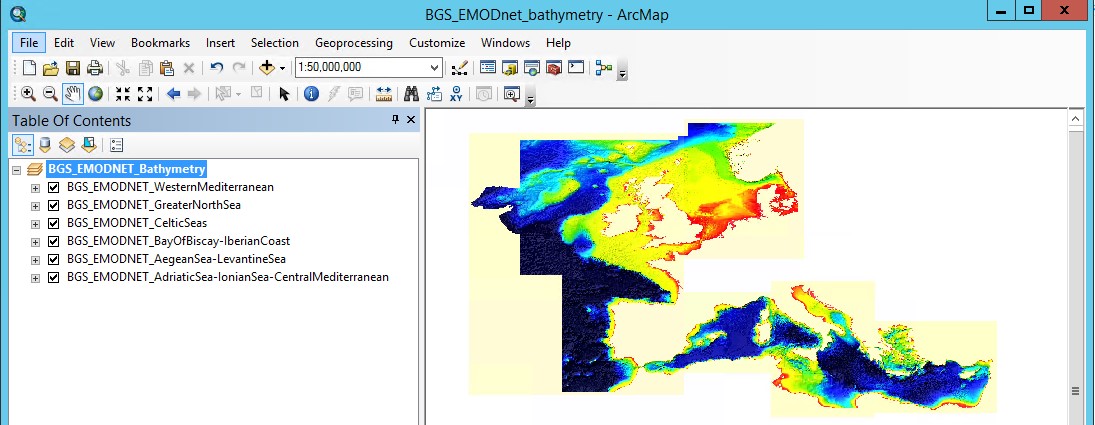
Figure 22 - Adding WCS data to your map document
Publish the WCS service
Go to File > Share As > Service… *to open the *Share as Service dialog.
Select Publish a service and click Next >.
On the Publish a Service dialog, choose/add a connection to your ArcGIS Server instance and write a name for your map service. The name you enter will be part of the WCS url. Click Next >.
Select whether to Use existing folder or Create new folder. The folder name will also appear as part of the WCS url. Click Continue.
In the Service Editor dialog, go to Capabilities and select WCS.
Now go to Capabilities > WCS to access the WCS properties
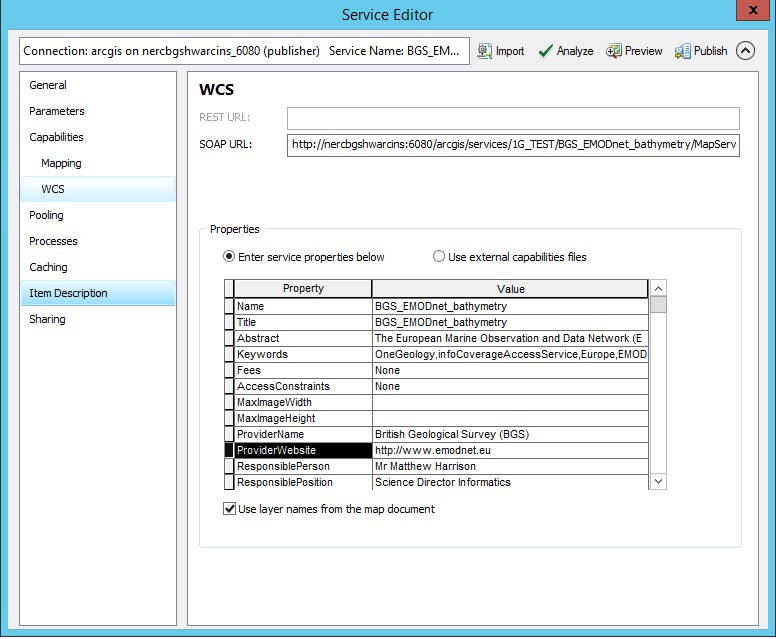
Figure 23 - WCS service properties
Fill in all relevant service-level and contact properties.
Check Use layer names from the map document so that layer names/identifiers use the layer names given in the map document rather than numbers.
Click Publish on the top-right corner of the Service Editor dialog to create your service.
Your new service will have a URL like below, with the folder name part being optional:
http://[hostname]/ArcGIS/services/[folder_name]/[map service title]/MapServer/WCSServer
Edit the GetCapabilities document
ArcGIS server doesn’t create any static GetCapabilities xml documents, but does allow you to use external files. You will need to use such external files if you want to add any supported CRS, add keywords and abstracts for coverages or modify coverage titles. Note that, independently of the supported CRSs added, ESRI WCSs will always support the over 6000 projections that come with the ArcGIS projection engine.
The quickest way to create your custom GetCapabilities document is to use the response documents from your initial service. You will need to have a file for all the WCS versions that you want your service to support.
Your WCS version 1.1.0 GetCapabilities document is generated using a request like:
http://[hostname]/argis/services/[folder name]/[map service title]/MapServer/WCSServer?service=WCS&request=GetCapabilities&version=1.1.0&
Save this as [short service name]110.xml
Your WCS version 2.0.1 GetCapabilities document is generated using a request like:
http://[hostname]/argis/services/[folder name]/[map service title]/MapServer/WCSServer?service=WCS&request=GetCapabilities&version=2.0.1&
Save this as [short service name]201.xml
It doesn’t really matter what name you give these files, as long as you use the same name prefix for all files that belong to the same service.
You need to put these files on the server (or at a location available to your server), and make them browsable. These files only need to be browsable internally by the ArcGIS server.
Now go back to your map service and edit it using either ArcGIS Server Manager or ArcMap.
Go to Capabilities > WCS, then select the “Use External capabilities files” option and in the ‘Specify the location and prefix’ dialog add the web address to the folder containing the capabilities response documents plus your [short service name] prefix.
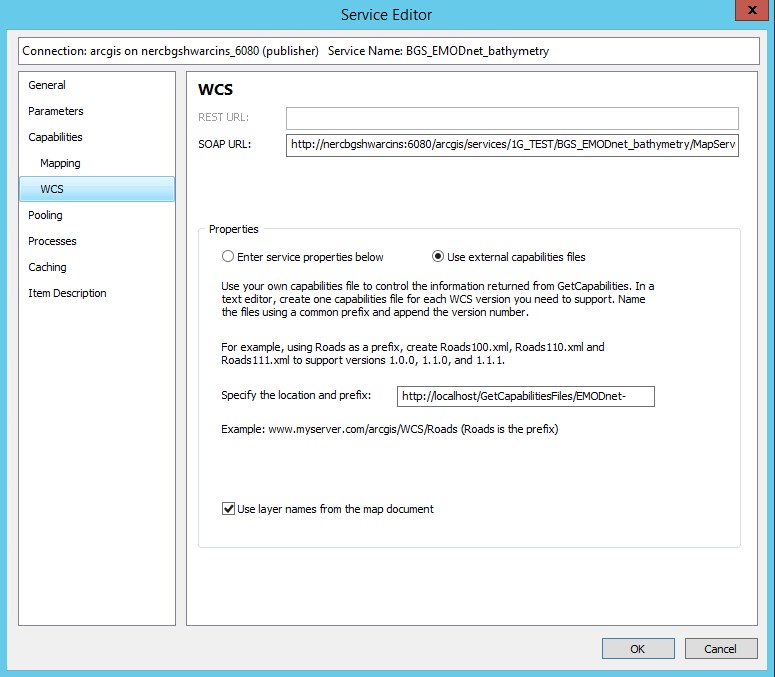
Figure 24 - WCS service properties: external capabilities
For example, for a service called BGS_EMODnet_Bathymetry, we may save our initial GetCapabilities response documents using a prefix “EMODnet-“, giving us a file called EMODnet-201.xml for our version 2.0.1 GetCapabilities response document, EMODnet-110.xml for our version 1.1.0 GetCapabilities response document and so on. We might then save these to a location on our web server such as C:\Inetpub\wwwroot\GetCapabilitiesFiles\ which would be browseable locally as http://localhost/GetCapabilitiesFiles/. When we select the “Use External capabilities files” option, we then provide the web address and prefix as http://localhost/GetCapabilitiesFiles/EMODnet-
Having created your files, you may then edit them as required. We would recommend you make a second copy of the files in case you make an error whilst editing.
We have found that, if you make a GetCapabilities request using external capabilities files, it always defaults to version 1.1.0, even if you specify a different version as a url parameter. For instance, http://[my_server]s:6080/arcgis/services/[folder_name]/BGS_EMODnet_bathymetry/MapServer/WCSServer?request=GetCapabilities&service=WCS&version=2.0.1 will return the GetCapabilities document for version 1.1.0 (if available, otherwise you will get an error), even though we’ve created the version 2.0.1 of the document. The only exception is version 1.0.0, which does return the correct version of the GetCapabilities document if specified in the url.
For more information, see Use external capabilities files with WCS Services.